
Mental ray is a production quality rendering application developed by mental images (Berlin, Germany).
As the name implies, it supports ray tracing to generate images. Its feature set is comparable to that of PRman, the RenderMan compliant renderer by Pixar, over which it holds certain advantages and disadvantages. For example, features like global illumination were supported by mental ray long before they could be found in PRman. Which renderer is faster is subject of heated debates. Certain rendering tasks can be much faster in PRman (sometimes at the expense of true physical accuracy) while others are much faster in mental ray (e.g. things involving heavy ray tracing or global illumination)
The primary feature of mental ray is the achievement of high performance through parallelism on both multiprocessor machines and across render farms. The software uses acceleration techniques such as scanline for primary visible surface determination and binary space partitioning for secondary rays. It also supports caustics and physically correct simulation of global illumination employing photon maps. Any combination of diffuse, glossy (soft or scattered), and specular reflection and transmission can be simulated.
There are already two methods of generating this in Max, which are Light Tracer and radiosity. Mental ray is high end, based on different technology.
This is just a very basic set up, only to make the noobs understand the basic mental ray parameters.
Nothing great in the scene; just a few boxes and teapots. There is one photometric free spot with a multiplier of 300% (I usually prefer using multiplier percentage over candela or)
No other lights used
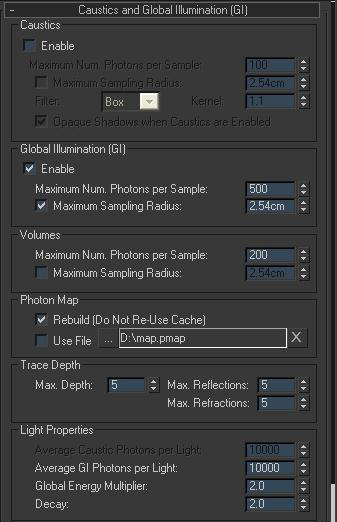
Assign mental ray as your renderer. Under indirect illumination, turn on Global illumination. Just leave the settings to default. See what you get.
Oops! Pathetic, blotchy!!!
Not that I would want to rectify this further at this stage but just wanted to show how “maximum sampling radius” affects the visibility of photons in your render. I check this option and set the Max sampling radius to 2.54 cm (note that my system units are set to centimeters)
Wow I see the photons so clearly. So I am going to
increase the radius to 100 cm. Also change the AA to 4/16
and use Mitchell for the filter. This one has always been my
favorite but then it totally depends on the scene requirements.
Ok, the blotches are almost gone. However I need to increase
the multiplier of the free area light and also increase the
Average GI photons per light I increased it to 20,000;
trying to get rid of the artifacts Lets see what I get
Hmmm, not bad at all!
But we want to further minimize the artifacts since this is a simple
scene with no reflective surfaces, no specular, no complex meshes.
But in complex scenes GI might not be enough. So we will turn the
final gather on. We need to test render, so I am going to set
the samples to merely 10 with 5 as the radius.
Better, but blotchy? That’s because we have very few
samples. We will increase it to 100. Hit render.
Almost there; but we need good blending so increase
the radius to 10 and we are all set!
Sweet! And I seriously love the color bleed! For complex
scenes you might want to take into consideration the anti
aliasing and higher final gather samples.

