Vray is one of the most advanced third party renderers for 3ds max, that supports most of the 3ds max features and many of the third party plugins. It also has beta versions for rhino and maya.
Heresa list of some of the prominent features that vray supports:
- True raytraced reflections and refractions
- Area shadows
- Glossy reflections and refractions
- global illumination
- Motion Blur based anti aliasing
- Depth-Of-Field camera effect
- Depth-Of-Field camera effect (fixed,2 level, adaptive subdivision)
- Caustics
- G-Buffer
- Vray material (optimised for faster rendering)
- G-buffer based anti-aliasing
- Photon mapping
- Reusable irradiance maps, caustics and photon maps
- True HDRI support
- Vray lights (with vray sun, introduced with vray 1.48 advanced)
- Different camera types: fish-eye, spherical, cylindrical and cubic cameras
- 2D and 3D displacement mapping
UNDERSTANDING THE VRAY Interface
Lets get started
Go to render settings dialogue box, Under assign renderer button select vray
(making sure that the vray server is running)
Other rollouts:
Once you choose vray as the renderer, dont be scared with the number of xtra roll outs.
Vray authorisation and about vray:
Gives you info about the licence settings and vray version
Vray frame buffer: Once enabled it overrides the max’s virtual frame buffer.
Get resolution from max: sets the resolution of the render according to the common render settings box in max.
Or you also have the option to set the resolution of your render using the output settings option Vray raw img file:this option is very handy when you are rendering very high resolutions, since it does not store any data on ram, hence helping you to overcome the difficulty of rendering large resolution images.
Vray Global Switches:
Here you can control many of the vray settings,usually used to speed up test renders
Displacement:Enables or disables vray’s displacement
Light section:
Lights-Enables or disables the lights globally. Even if you disable this option ,vray will render the scene using the default lights
Default lights: Enables or disables the default lights
Similarly you can turn on/off the shadows hidden lights,reflections etc. The “don’t render final image” option is used when you want vray to only compute GI.
Override material,generally used for test renders,to override all mats in the scene with one mat chosen
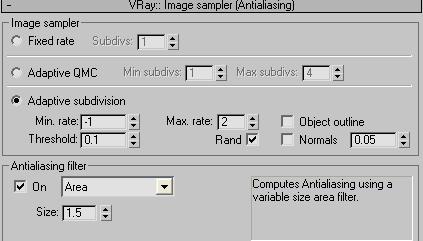
Anti Aliasing:
Vray’s optimum AA helps you removed the jagged edges in your renders.You can choose between 3 options:
Fixed: This is very predictable and used when your scene has many glossy reflections,area shadows..etc.More subdivisions mean more accuracy and higher render time
Adaptive QMC: This sampler does not calculate fixed pixels like the previous one.Instead it adapts its calculation to the situation. However it should not be used in scenes with blurry effects since it can create dark regions. It also does not have its own threshold control, so you will have to rely upon the QMC rollout the control the noise threshold.
Min subdivision: Sets the minimum number of samples per pixel
Max subdivision: Sets the maximum number of samples per pixel
Adaptive subdivision: This is an advanced sampler capable of undersampling (calculating less than 1 sample per pixel)It can be fast in most cases. However with many glossy effects in the scene it can be quite RAM consuming.
Which sampler to use when?
It is highly situation specific. For smooth textured scenes with less glossy surfaces ,motion blur…etc I would use adaptive subdivision. For complex scenes i would rather choose Fixed.
Anti Aliasing Filters: All 3ds max filters are supported, except plate match.
Filters generally used are Mitchelle Netravali, Catmull Rom, Area,Soft…etc. Others may used depending upon the requirement.
 Indirect Illumination:
Vray,like all other GI renderers, differentiates between primary and secondary bounces.
You again have several options like Irradiance map, photon mapping, light cache, QMC
cache are the different options you have to calculate GI bounce. (more info would be discussed in next few articles) All these methods bear close resemblance to actual GI, tailored to reduce the render time.
Vray Environment:
Vray does not have its skylight system. The similar effect is possible by using Vrays’ Environment rollout.
GI environment: When used it overrides the 3ds max environment settings for GI calculations. You can also use texture or an HDR for the same. The intensity can be controlled by the multiplier
Reflection/refraction environment: This when checked, will override 3ds max’ default settings when reflection /refraction is calculated
NOTE: These settings will not show up as a background, for which you will have to use the 3ds max environment.
Color mapping: Helps to post process within vray. You have options here like:
Linear: This multiplies the final image color based on their brightness. At times it leads to burnt out patches at places close to light
Exponential: This saturates image color based on brightness.
HSV: It preserves the color Hue and Saturation
Dark colors: This is the multiplier for dark colors.
Bright colors: This is the multiplier for bright colors.
The QMC sampler:
One of the most important rollout which works as the control centre related to all blurry values in vray like anti-aliasing, depth of field, indirect illumination, area lights, glossy reflection/refraction, translucency, motion blur etc.
The most important being noise threshold. Lesser the value, more the perfection at the cost of render time. Global subdivisions multiplier is used to quickly increase decrease sampling quality.
However it does not affect lightmap, photonmap and caustics.
Minimum samples: determines the minimum number of samples that must be made before the early termination algorithm is used. Higher values will slow things down but will make the early termination algorithm more reliable.
Caustics:
On: Turns caustics on/off
Multiplier – This multiplier controls the strength of the caustics
Search distance: When vray traces a photon that hits a geometry, the raytracer searches for more photons in the given distance. In other words, the photon is the centre and the radius is the search distance
Max photons: Controls the max photons calculated in the search distance when vray traces one photon in a particular area.
Like Irradiance, photon map; caustics map can also be saved
System: This rollout is pretty huge. Let me discuss a few of the important parameters.
Max Tree Depth: Larger values uses up more memory but fastens the render time
Render region division: Render region division. X and Y control the width and height of a render bucket. For small render resolutions, you can lower these, for high resolutions you can increase these
Object settings: Helps to set the GI and caustics settings for all the geometry in the scene
Light settings: Specifically used when photon mapping. Helps set the subdivisions and GI/Caustics participation for every light.
Frame stamp: Helps put some short text over rendered images, like name of the renderer, rendering time,etc…which can be edited

