
17)Anything else you would like to add?
How to Use Clay Modeling Tools
Learning how to use clay modeling tools can help you achieve professional results.
There are many tools artists use to shape and alter the look and feel of modeling clay. Modeling clay can be oil-based or polymer-based, and is pliable and soft to the touch when moist but hardens once you leave it to dry. Modeling clay is easy to work with, but achieving intricate shapes without using the proper tools can be tricky. Learning to use these tools is one way you can bring your clay models up to a professional standard, and you can play around with the tools to learn new techniques.
Sculpting Tools
Sculpting tools do many things that the potter’s hands simply cannot do. Used primarily for fine details, they are typically wooden, plastic or metal and are round or flat sticks with a pointed end, often tapered significantly. Sculpting tools incise the clay, creating decorative stripes or leaving functional indentations. Not all sculpting tools are commerically produced and purchased. Some potter’s use carved dowels, dental tools or even old paint brushes for scultping purposes.
Shaping Tools
Tools to shape the clay are used more on the pottery wheel than on a solid surface. Ribs, scrappers and fettling knives are tools made of rubber, hardwood or metal. They are all used for smoothing and shaping wet clay into curved forms while it spins on the potter’s wheel. Ribs and scrappers tend to be used interchangeably, although scrappers are lighter and softer and work better than ribs on wetter clay. Fettling knives are elongated pieces or metal or plastic, typically with a wooden or plastic handle. They come in varying degrees of flexibility, and can be used in place of ribs or scrappers.
Cutting Tools
There are many tools used to cut clay during modeling. Loop, wire and ribbon cutting tools are all used to remove clay a little at a time until the desired size or effect is reached. Loop cutting tools are typically made of a wooden or plastic handle with a metal loop on either end. Loop tools can be used with a pottery wheel or on a solid surface. Ribbon tools are used to scrape straight lines into the clay, or to cut a flat surface by scraping the surface at a 90 degree angle. Wire cutting tools are just like loop cutting tools except far more fragile, and are rarely used during throwing pottery because they can easily be damaged by the clay if it is moving too quickly.
Measuring Tools
Most sculpters employ at least one set of potter’s calipers, if not several in varying sizes. Calipers are used to measure width, thickness and diameter of the clay. Having accurate measurements is important in order to keep the pottery consistent all the way around, as well as creating lids and other items which must “match” another piece. Potter’s calipers can be made of plastic, wood or metal.
Claymation for Beginners
Modeling clay can be used to create movies.
Claymation is a form of stop-motion animation, and is one of the oldest and simplest versions of three-dimensional animation used. Rather than using drawings on paper or celluloid, sets and characters are made out of clay and moved by hand before being filmed. Claymation can be a lot easier and less expensive to produce than CGI 3-D animation. However, stop-motion animation is still a very time-consuming process that involves detail and shooting one frame at a time a look very similar to clay.
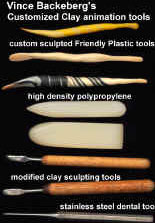
If you look at the picture, the tools on top were made from a product called Friendly Plastic. You can find it in many craft stores. It softens at low temperatures(near boiling water works) and you can shape it into a variety of forms. I like it because you can easily make very organically shaped tools that would be very difficult to create from wood or metal. If you look closely at the first one you will notice that it has a flat shape on one end, and a rounded sphere shape on the other. There’s a reason for this. When you are animating on a cramped set where you have to reach in to sculpt your character it can be a pain in the neck to swap tools. If you make commonly used tools like this you can flip it around in your hand instead of putting it down and picking up a second tool.
The second set are made from a high density polypropylene plastic. These can be polished with very fine grit sandpaper(1200). These are great for pressing wrinkles and folds into clay clothes, especially at the joints inside the arms. If you are lucky you can find a plastic supply house in your town to find this material. And if you are really lucky, you can get it for free. One afternoon a few of us at Vinton’s went to a local supplier and they gave us some scraps. One ‘scrap’ was a three foot long piece that had some minor surface imperfections.
The third set are common clay tools you can find at any sculpting or
pottery supply house. They originally had sharp ends on them, they were filed down, rounded off and polished on a buffing wheel. This is the only tool that almost every animator had a variation of. In fact, these were the very first customized tools I made while at Vinton’s.
The last is a stainless steel dental sculpting tool. Dental supply
houses have a wide variety of tools that are perfect for clay.
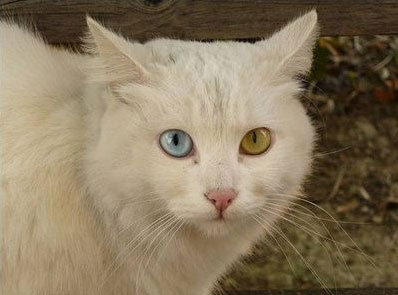
How to Make Ceramic Cat Fur
Make Ceramic Cat Fur
Though it is often traditional to create ceramic cats without texture, those artists who wish to create more realism in their sculptures will find themselves met with the challenge of how to render animal fur in clay. While clay artists have developed a number of techniques for this, what works best for cat sculptures often depends upon the breed of cat being created. Long and short haired cats, as well as cats with unusual fur, can be created using similar techniques and different texturing tools made from household items.
Things You’ll Need
Ceramic clay cat sculpture
Fine hair comb or eyebrow comb
Long, soft-bristled paint brush
Instructions
1 Sculpt tufts of fur in appropriate places on your cat sculpture. Pull clay away from the body and pinch it off to form tufts in places like tips of ears, tails, cheeks and joints on the feet.
2 Moisten the surface of your ceramic clay. Subtle effects like fur texture require a sensitive clay palette, so wet the surface of your cat by dabbing it gently with a sponge or lightly spritzing it with a spray bottle. Wait a few minutes for the moisture to fully soak in.
3 Create lined fur texture with a fine-toothed comb. Lightly brush the surface of your cat sculpture with the fine end of a hair comb, or better yet, an eyebrow comb. Use short strokes and be sure to go over the surface of the cat a couple of times and layer the textures, or the effects will be too uniform to look natural. Use this technique for sculptures of short-haired cats, whose fur tends to lie flat and straight.
4 Make wavier fur texture using a paintbrush. An old paintbrush with long, soft bristles can be used to create fur texture using the same light brushing techniques, but the softness of th bristles will create wavy hair such as is seen on more long-haired cats.
5 Use a paper towel to create fluffy cat fur texture. Press a piece of dry, clean paper towel against the moistened clay to imprint the texture of the towel’s weave against the sculpture. This will create a curly look such as is seen on exotic short-hair cat breeds like the Rex.
6 Create rumply fur using an old toothbrush. Use this technique for cats with curly hair that is long. Press the bristles of the brush into the softened clay and wiggle the brush very slightly in a circular motion, creating indentations in the shape of the bristles. As with the brush and comb, be sure to layer this texture several times.
7 Fire and glaze your sculpture as normal.
Clay Modeling Techniques
Making figures out of clay is a relaxing and rewarding hobby. Don’t worry about modeling the figures for accuracy. Instead, concentrate on enjoying yourself.
Ground Rules and some tips
If you are making a model from clay with the intent to have it fired, you must remember a few rules. Before beginning your project, the clay must be wedged. This means that you must knead the clay like dough, pressing out all the air bubbles. If there are any air bubbles or hollow enclosed parts of your project, it will explode in the kiln.
In order to attach one clay part to another, you should use a method called “scoring.” Score the clay by using a needle tool or a modeling tool to make hatch marks in the two pieces of clay. Make the hatch marks only where the two pieces will be touching each other. Next, wet the hatch marks with water or slip (which is water with clay suspended in the mixture), and then attach the two pieces to each other. This is scoring. Scoring is necessary because without it, the pieces will likely crack and fall apart from each other either when they dry or in the kiln.
The final product must be no more than one inch or one and a half inches thick. It must be completely dry before firing. When the clay has completely dried, it will be hardened and lighter in color, and it will be room temperature. They clay will take anywhere from two days to several more days to dry, depending on its size.
Slabs, Coils and Pinch Pots
Unless you are working at a potter’s wheel, pots, containers and structures in clay are often made through one of three ways: with slabs, coils and pinch pots.
Pinch pots are probably the easiest structure to make in clay. Pinch pots are frequently the first project taught to children in pottery classes. Start by rolling the clay into a ball. Hold the ball in one hand, and press the thumb of your other hand into the ball, until it is midway through (or a little farther). Now, hold the ball with your thumb inside and pinch the wall of the ball between your free fingers and your thumb. Rotate the ball 30 degrees on your thumb, then pinch again. Rotate, then pinch again. You will notice the hole in the center of the ball growing wider. The ball will no longer be a ball at all; instead, it will take on the shape of a cone or a bowl. This is your pinch pot. Continue to mold the pot until the walls are the appropriate thickness and shape.
Pinch pots have many uses in clay modeling. Try making the pinch pot into an animal by attaching feet to the bottom and a head and tail to the sides. For a slightly more realistic-looking animal, turn the pinch pot upside down before attaching the head and legs, so that the pinch pot becomes a body and loses its functionality as a bowl.
If you need to make a larger clay body for modeling a larger object, try making two pinch pots and scoring them together to form a sphere with a hollow center. Remember that the hollow inside will cause the object to explode in the kiln, so be sure to use a needle tool to make a small hole in the body of the clay. One tiny hole is enough to allow air to pass back and forth between the inside and outside of the clay body.
Another method for creating structures in clay is with coils. Use your hands to roll a coil (a long tube like a snake). Shape the coil into a circle, then begin to stack coils on each other to form the walls of a tube or a pot. Remember to score the coils together. Smooth the coils for the appearance of a uniform wall, or leave them in their coil form for decorative purposes.
The final method is by making slabs. Slabs of clay are rolled out with a rolling pin and then cut into whatever shape desired with a clay knife or needle tool. These slabs can be used to make the walls of a box or a clay house or a mug. Flat objects such as signs and tiles can also be made this way. To make a completely round slab, trace around something that is already round, like a cup or a coffee tin.
Organic Figures
Make an organic figure by first picking a subject to make. You might want to look off of something real to model from. Examine the textures of the figure, and consider how you will proceed before beginning. It is often best to break a figure down into its most basic parts and assemble the figure piece by piece. As an example, if you were making a fish, you would start by forming the body from a hunk of clay. You would form the tail from a slab or another hunk of clay and score the tail to the body. The head of a fish is more or less a part of the body. You would use a needle tool to make the eyes and give texture to the tail as necessary. By pressing small-hole netting into the sides of the body, scales would be formed. After working with the clay and alternately smoothing and texturizing to your tastes, form the fins and attach to the sides by scoring.
Once the figure was made, then you would hollow out the figure from the bottom if necessary and set it to dry.
Modeling Clay Tips
Clay modeling is a great way for those looking to develop and exercise their artistic talents in a 3-dimensional medium without the difficulties associated with reduction sculpture. However, while experimenting with clay may be child’s play, developing the skills for real mastery of this art form is a little more complicated. A few helpful fundamental techniques can go a long way.
Softening
Before working with any modeling clay, it’s important to soften the clay thoroughly. With some clays, such as oven-bake polymer clay, that means warming the clay in your hands while working with it, while earthenware pottery clays are softened by working water into them. Either way, a good way to soften stubborn clay is to start with a small amount that you can work into softness with fingertip pressure, and then gradually add more clay as you go. This is easier than trying to soften a large amount all at once.
Proportion
Developing a sense of proportion is important for successful modeling. Learning this skill is largely a matter of trial and error, but the more you work with clay, the more you will begin to have an instinctual sense, both visual and touch-based, of the amount of clay you want for different sculpture components. However, you can help the proportion in your pieces. Any time you want to create a sculpture with parts of equal size (for example, the legs on the model of a figure), pull 2 pieces of clay and shape them into balls of the same size. This way, after creating the 1st leg, you will know exactly how much clay to add or subtract to the 2nd ball to make the 2nd leg exactly the same size.
Tools
Many professional tools are made for working with clay, including wire cutters and wooden, metal and plastic picks, knives and flat-edged shapers. These can be useful pieces to have in your clayworking arsenal, but you may also find that your favorite tools are improvised tools. Try household objects like toothpicks, knitting and sewing needles, screwdrivers, chopsticks and nail cuticle tools. You may also find that pressing clay against surfaces like walls, baskets or sheets of sandpaper gives your work a unique texture that enhances its appearance.
Blending
Another important clayworking technique is blending. Without proper blending, sculpted pieces that are attached to one another won’t have any structural integrity and will easily break. For the best and most secure blending, soften (and moisten, where applicable) both the piece being attached and the body of the sculpture where it’s being fastened. Press the 2 pieces firmly together, and then blend the clay together at the edge with your fingertip. Ideally, there should be no visible cracks between the 2 pieces and the clay should appear to 1 single, solid piece.
connect@animationxpress.com